|

Inertia of a car wreck demonstration
|
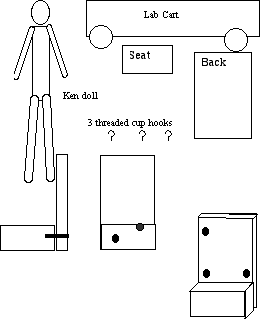
Materials
- lab cart
- 2 x 4 x 4 (seat)
- 6 to 8 inches of
4 x 1/2 (back)
- 3 threaded cup hooks
- ken doll
- two rubber bands
- string
- weight
- table clamp pulley
- 2 wood screws 3/4
inch
- 2 wood screws 2 1/2
inch
Construction
- Screw back to seat using two wood
screws.
- Screw threaded cup
hooks into back. One
should be just above the shoulder height of the doll when seated
and the other two at waist level.
These are the anchor points for the seat and shoulder harness.
-
Fasten seat assembly to cart.
Use wood screws(for permanent) or duct tape to attach the
seat to the cart. If using screws through the cart, drill
pilot holes.
-
Tie the string to front of cart and the other end to a kilogram
or so mass. Place
table clamp on end of table and position crash wall in place.
The crash wall is two 2 x 4 x 4 sections c-clamped to the table
with a 12 x 4 x 4 laying up against them. This prevents the collision
damaging the table top pulley.
|
|
Demonstration
Use the two rubber bands as lap and shoulder belts. Ken can crash wearing no restraint, lap
only, shoulder only, or both. Students
can easily see the types of injuries that may occur when not secured properly.
I find the students are interested in the evolution of automobile
safety features. When conducting the demonstrations move
the students away from describing ken as being “thrown from the
car” and towards correct statements involving inertia and forces
exerted on the car. My Ken is nicely “seasoned” and his head pops
off most dramatically when wearing only a shoulder harness.
Click
here to return to the newsletter's homepage
Click
here to go to the Web sites main menu
|