Overhead projector ripple tank
Click here for a WORD version of this handout.
Click here for a pdf version of this handout. (It will open in a new window.)
|
| Presenter: |
Andy Jackson Harrisonburg High School ajackson [at-symbol] harrisonburg.k12.va.us
|
| Va. SOL |
5.3 |
The student will investigate and understand basic characteristics of visible light and how it behaves. Key concepts include |
| |
| a) |
transverse waves; |
| b) |
the visible spectrum; |
| c) |
opaque, transparent, and translucent; |
| d) |
reflection of light from reflective surfaces; and |
| e) |
refraction of light through water and prisms. |
|
PS. 9 |
The student will investigate and understand the characteristics of transverse waves. Key concepts include |
| |
| a) |
wavelength, frequency, speed, amplitude, crest, and trough; |
| b) |
the wave behavior of light; |
| c) |
images formed by lenses and mirrors; |
| d) |
the electromagnetic spectrum; and |
| e) |
technological applications of light. |
|
PH. 8 |
The student will investigate and understand wave phenomena. Key concepts include |
| |
| a) |
wave characteristics; |
| b) |
fundamental wave processes; and |
| c) |
light and sound in terms of wave models. |
| |
|
|
| Topic Concept |
| |
Wave properties. |
| Materials |
| |
- 11” x 14” “box” plastic picture frame
- ¾” PVC pipe cut into the following lengths
9”
4”
2.5” (2 of these)
1.5”
- 2 elbow connectors
- 7” x 7” x ¼” triangle of plexiglass
- Open cell foam or sponge
- Overhead projector
|
Safety Considerations |
| |
Water and electricity. Make sure overhead projector is plugged into GFCI equipped circuit. Fill ripple tank while on the overhead to reduce chance to spill water. Unplug overhead and allow to cool before removing ripple tank.
|
| Presentation |
| |
|
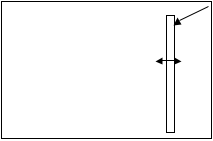
Place 9” PVC in ripple tank and rock it back and forth. This creates wave fronts that move through the ripple tank and can be projected with the overhead projector. Bright areas on the screen represent wave crests. |
|
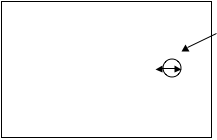
Place a 2.5” piece of PVC on end in the ripple tank and wiggle it gently with your finger so it rocks a little. This will create circular wave fronts. |
|
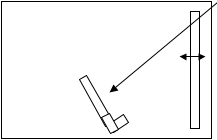
Put elbow connector on 4” piece of PVC and let it act as a barrier for wave fronts to reflect off. The elbow keeps the PVC pipe barrier from rolling. Adjust the angle of the barrier relative to the incoming wave fronts to explore the law of reflection. |
|
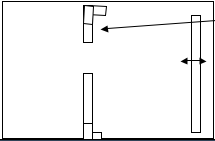
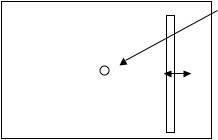
Put elbow connector on another piece of PVC and arrange the two barriers to create an opening for the waves to pass through. Choose different lengths of PVC to adjust the opening width to examine the effect on the wave as it passes through the opening. |
|
Place a plastic bottle cap or a short vertical piece of PVC pipe in the ripple tank. Generate wave fronts by rocking the 9” PVC pipe back and forth. Observe how the waves reflect off of the circular barrier. Observe the wave diffract around the obstacle as they pass on either side of the barrier. |
|
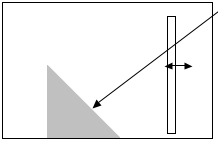
Place the triangular section of plexiglass in the ripple tank. As the generated wave fronts encounter the shallow water on top of the triangle their speed will be reduced and the wave front will bend demonstrating refraction. |
| |
|
How the physics is demonstrated |
| |
This provides an inexpensive overhead projector ripple tank for demonstrating wave phenomenon. I use it as a practical test. After my students have completed their unit on waves, I demonstrate the different wave phenomenon with the ripple tank and they name and explain the phenomenon being demonstrated.
|
| Construction and Tips Regarding the Demonstration |
| |
Construction
- start with a 5’ piece of ¾ inch PVC
- cut into 3 20 inch sections
- Each section will supply materials needed for 1 overhead ripple tank
- Cut 9” piece off of pipe – set aside – this is the wave generator
- Cut 1 5” piece off of remaining pipe
- Cut this piece in half for your 2 2.5” pieces – set aside – these are barriers
- Cut 4” piece off of remaining pipe – set aside – this is a barier
- Cut 1.5” piece off of remaining pipe.
You should now have ¾” PVC pipes of the following lengths:
- 1 x 9”
- 2 x 2.5”
- 1 x 4”
- 1 x 1.5”
- 1 x ~0.5”
Tank
Remove all cardboard from picture frame and discard. Plastic frame laid down on face on top of overhead projector forms the ripple tank. Fill with water just less than ½” deep. Line the two long sides and one short side with strips of foam. This greatly reduces reflection off of the sides of the tank.
|
Sources & References |
| |
Box picture frame can be found in any stores. The ones used for the VAST 2010 make and take were ordered from http://www.pfile.com/product/j-bf-11/11x14-Picture-Frames (link current as of Dec 2010.)
|