|
Thanks
Thanks to the folks at James Madison University for hosting the joint
meeting of the CSAAPT and the VIP meeting. JMU did a lot to help
bolster the quality of the meeting. Thanks also go to Andy Jackson,
VIP Vice President, for arranging the joint meeting at JMU.
Next Meeting
The next VIP meeting will be held at the VAST conference in Roanoke.
We are sponsoring 3 sessions. A disscussion session, Amusement Park
physics (in cooperation with the sceince Museum of Virginia), and a
demo session. Nov 8 & 9. Hotel Roanoke
Toy Science
by Tony Wayne
Topic: Rotational Inertia
There is a toy gun on the market now that shoots little foam disks.
The gun has few market versions differing in general gun shape, color
and price, $5-10. The most common one I've seen it the "Power
Rangers..." or "Batmen Disc Shooter." The disks the gun shoots are
about the size of 2 stacked silver dollars. When the disks are shot
out of the gun they spin, like a frisbee. This spinning is what gives
them stability. The stability comes from rotational inertia. Spinning
the disks increases their inertia. With an increase in inertia, the
disk better resists any change in motion. In other words, spinning
disks fly farther because they don't wobble in the air and don't
succumb to air resistance as quickly as a non spinning disk.
DEMO

Take a disk and with a permanent magic marker, color in a quarter of
the disk. Shoot the disk horizontally.

Coloring the disk makes it easy to see it spin. Why is it the
disks all curve to the same side when I shoot them and then curve to
the opposite side when I shoot the gun upside down? Frisbee's
experience the same problem. (That's why Dr. Adler invented the
Aerobee.) The answer can be broken up into 2 parts, lift, and the
principle of gyroscopes.
For any flat disk being thrown through the air, the lift is not
uniform over the area of the entire disk. The greatest amount of lift
occurs at the leading edge.
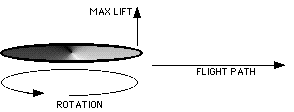
The principle of gyroscope says that an applied force on a rotating
object a act as if it were applied 90 later in the object's rotation.
This means the maximum lift will be acting as it were not at the
front but to the side.
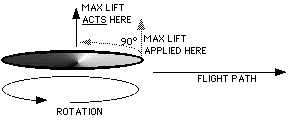
This causes the disk to angle during the flight such that the far
side rise and the near side droops. The disk curves.
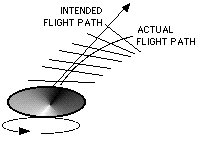
Reverse the direction of spin and the disk consistently curves to the
other side.
Note: These same principles can be demonstrated with a frisbee or pie
plate. ...I just needed an excuse to buy the gun, <grin>.

BUILDING A 2 LITER WATER ROCKET
BY: GARY ENSMENGER
This is my proven method of building a successful three section 2
Liter Water Rocket that goes very high. I've redesigned it to be
fabricated from readily available materials for your convenience.
This is not a "quick and dirty" method because you will have to allow
several days for the Goop Adhesive/Sealant to set up hard, before
using. When the Goop Adhesive/Sealant has been allowed to hardened,
the nose cone will be water tight. This will allow you to experiment
with various amounts of water (for weight) in the nose cone to get
optimum height.
TOOLS AND MATERIALS
TOOLS REQUIRED: Knife, scissors, pencil (or stick) with mark 3.25"
from end, caulking gun, flat table top, small metal rod about 1/8"
diameter, permanent ink marker, ball point pen.
MATERIALS REQUIRED: 2 each empty 2 liter bottles, DOW CORNING
Stryofoam R-3 Sheathing, GOOP Clear Household Adhesive/Sealant (in
caulking tube), 3/4" or 1" masking tape, 2" wide clear package tape,
Dixie Textile "Stuck Up" spray adhesive (or substitute with another
high solids spray adhesive that will stick to outside walls of 2
liter bottle, yet will not dissolve polystyrene fin material.
SELECTING 2 LITER BOTTLES
By weighing empty 2 Liter Bottles, I found that Swepps and Canada Dry
have heavier bottles than Coke or Pepsi. The discount store brands
had the lightest bottles. The heavier bottles weigh more because they
have more plastic resin, and probably thicker wall thicknesses.
Since half the bottles used for construction will be part of the
pressurized system in the bottom portion of the rocket, I save the
best bottles for this section of the rocket. Visual inspection can
sort out most rejects. Look for irregularities such as: air bubbles
trapped in the walls of the bottles, scratches, cuts, dent creases,
etc.
Also, for bottles selected to be the bottom (pressurized) section of
the rocket, it is always good to pretest it for launch tube sizing.
Simply slide the bottle over the launch tube of the 2 Liter Launcher.
If the neck of the bottle is too small and does not easily slide over
the launch tube, reject it and use it for a nose cone.
Other bottles that have been scratched, dented, flawed, or culled out
(for any reason), will be selected for the top "nose cone" portion of
the rocket.
CONSTRUCTION OF THE 2 LITER BOTTLE ROCKET 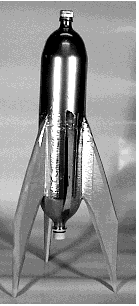
Chose two bottles. One "good condition" bottle for the pressurized
bottle section, and another bottle for the top "nose cone" section.
The first tasking is removing the labels. Carefully peal off the
labels, without cutting the bottles.
Take a bottle selected for the top portion "nose cone" of the rocket.
Locate a spot that is on the side of the bottle, near the base, just
below the molded circumference ridge, about 2 inches from the bottom.
With a knife, puncture a slit large enough to inset scissor blades.
With scissors, cut around the circumference, cutting off the bottom
"base" section.
Clean soda beverage residue from inside of the bottle and thoroughly
dry. Clean and dry the base too. Remove bottle cap.
With the Goop adhesive, squirt two 1/4" beads around the inside
circumference of the top portion of cut bottle, about 4 inches from
the cut edge. Shove the cut off base section (bottom end first) up
inside the bottle. Using a pencil or similar object with a mark 3.25"
from one end as a depth gauge, put in neck hole (with bottle cap
removed). Continue to slide the base inside the bottle until it
indicates that it is 3.25 inches from the outside edge of the small
end of the bottle. You will notice that the clear adhesive has been
forced between the two bottle sections, making a nice airtight seal.
I like to test the airtightness at this time by LIGHTLY
blowing into the small end of the bottle.
DO NOT INHALE
, you could inhale the fumes from the adhesive. If air passes
through, that is bad. You will have to quickly push out the base with
a stick, and repeat procedures in this paragraph. Chances are, you
will have an airtight seal the first time.
Next, you will join the top and bottom portions of the water rocket.
With the Goop adhesive, squirt two 1/4" beads around the inside
circumference of the top portion of cut bottle, about 1/4" inches
from the cut edge. Before joining, I like to line up the residue from
the removed soda labels on both bottles. Now join the bottles by
pushing them together. To assure straitness of both bottles, roll the
joined bottles, similar to a pastry rolling pin, on the flat table
top.
To reinforce this connection, I spray an adhesive called Stuck Up
around the circumference of this connection about 3" wide. I spray
the adhesive over a newspaper backdrop. Put the bottle on the launch
tube, to prevent it from accidentally sticking to the table. After
several minutes, after the solvents from the spray have dried, the
adhesive is very tacky. I go around the connection with 2' wide clear
package tape. I find it easy to spin the bottle, while on the launch
tube, to apply the package tape.
The center section needs to be vented. Heat one end of a small metal
rod and poke several holes (by melting) in the middle section only.
(Substitute metal rod by holding a nail with pliers.) Do not puncture
the top or bottom sections! These vent holes in the middle section
perform several functions. They allow fresh air for the glue (trapped
in the middle section) to cure. They also prevent pressure build up
in the middle section which will separate the middle and lower
sections if you expose the rocket sections to sunlight and heat.
All the sections of the body of the rocket has now been joined. Now
it's time to add "fill" windows, and later the fins. The fill windows
are areas you will be able to view the water level as you fill.
Normally, there will be the same number of fill windows as there will
be fins. The fill windows are placed between each two fins. The
masking tape is placed on the sides of the bottom rocket section full
length (about 9") from top to bottom of the bottom section only.
After fins are attached and any painting and decoration are finished,
this masking tape is removed to provide a window.
ROCKET FINS
One thing you need is good rocket fin materials. Hopefully materials
that are readily available. Recently, I've been experimenting with
DOW CORNING Stryofoam R-3 Sheathing. It's a greenish blue extruded
polystyrene insulation. It's a better grade of polystyrene than the
common white polystyrene "coffee cup" material. I found it at Home
Depot hardware store. It's 1/2" thick, by 48", by 96". It cost about
$7.50 for a full sheet. This will make probably 150 fins or enough
for about 50 rockets, which is about 5c per fin. This material cuts
very easy with a sharp knife, razor, or band saw. Be sure to select
adhesives that are compatible with polystyrene.
I've started working with this material by cutting it in 3.5" wide
strips. Of course, by cutting the strips in 96" lengths, instead of
48", there will be a higher yield of fins per sheet. Draw a line with
the permanent ink marker down one 1/2" edge of a 3.5" strip.
By using a pattern of a fin which minimizes waste, there will only be
waste before the first and after the last fins only. A pattern
template should be included with the 2 Liter Launcher package. Note
the permanent ink marker line on one side of the template. Position
the permanent ink marker line of the template on the same side of the
permanent ink marker line of the 3.5" strip. With ball point pen,
trace outside of template on 3.5" strip at top, repeat as many times
as possible on strip (about 15 times).
Using a sharp knife, or band saw, cut fins from the 3.5" strip. To
reduce air friction, I like to use a sharp knife and round off the
square corners all the way around each fin, and on both sides, EXCEPT
the sides with the permanent ink marker line, which is the side which
will be attached to the bottle.
One word of caution - do not attempt to attach the fins with hot melt
glue. The hot temperature of the glue will shrivel the bottle, and
will also wilt the polystyrene. As the bottle pressurizes and
deflates, the bottle actually expands and shrinks, and the hot melt
glue, which will not expand or shrink, will crack loose from the
bottle.
It is time to decide the position of where the fins will be attached.
It is best to place the rocket all the way on the launcher tube.
Position the first fin (equally between two masking tape strips (for
fill windows) and draw around it on the bottle with the permanent ink
marker. Make sure that the position of the fins are not too low which
would hit the plywood base of the launcher. Repeat drawing positions
for other two fins.
This is a good time to protect the plastic flange by the neck of the
bottom bottle. Cover the circumference of this flange with a 5 inch
long piece of masking tape. Sometimes adhesives and paints can
collect on the top side of this flange and cause problems with the
first few launch attempts, until this residue is worn off.
Remove bottle from launch tube, place over newspaper backdrop, and
spray the three marked areas. Place bottle back on launch tube for
drying. Stack the three fins and spray them together. Spray the side
with the permanent ink marker lines only. If you have an electric fan
nearby, it would help to blow some air on the fins to reduce any
solvent damage to the polystyrene. After several minutes, allowing
the solvents to dry, repeat spraying bottle and fins a second time.
Separate the fins quickly after the second spraying.
After several minutes, attach the first fin by carefully positioning
it over the permanent ink marker pattern. Repeat for other two
fins.
Reinforce the stability of the fins to the bottle by adding masking
tape, or duct tape, to the left and right side of each fin. First,
spray the six each inside corner areas (about 1" wide by 6" long) on
both the fins and bottle to be taped with adhesive. Several minutes,
apply second layer of adhesive. Cut six strips of tape about 6" long.
After several minutes, fold the tape in half (on it's width) and join
half to the fin, and the other half to the bottle.
The rocket should stand on it's own. If it's lopsided, it's easy to
use scissors to shorten the longest fin. For future painting, it's
best to not expose the launcher to sprays, because the residues could
get into the trigger system or coat the launcher tube. The rocket now
stands on it's own and won't fall over while being sprayed. Now is a
good time to screw on the bottle caps on both ends, which will
prevent residue from entering the bottles.
The functional part of the water rocket is finished.
Now it's time to decorate the rocket and make it pretty. Test paint
reaction on waste fin material. Most spray paints will not be
compatible with the polystyrene fins, unless they are a spray acrylic
(water base) enamels paint.
One that works well is called Plastic Kote.
For the bottle, Bright Coat Aluminum or Chrome look very nice. Also
florescent sprays look good also. If the bottle is first sprayed
chrome, it seems like the other colors coat better. Have fun creating
your own designs.
After paint has dried, remove the masking tape around the flange and
for the fill windows. Remember to allow several days for the Goop
adhesive to dry.

WHAT DO YOU DO ON THE FIRST DAY OF CLASS?
FROM UNKNOWN
On the first day of class I often stage a race between a can of Cream
of Chicken soup and a can of Chicken Gumbo. The kids like to think
about why the Chicken Gumbo always wins. These students have never
had any "real" physics teaching up to this point (with all due
respect to my colleagues) and I use the race to them understand just
what sort of questions we'll be thinking about in the year to
come.
FROM UNKNOWN
Buy some plastic plumbing pipe of appropriate size through which a
stack of magnets can easily slide. Or even make a thick paper tube
and wrap it with lots of tape so it is fairly rigid. Wind your coil
on the tube. A long vertical tube with the coil on the lower end
should be best. Fine wire with many turns is best for your coil. When
the magnets are dropped through, the LED should flash. If you connect
a red and a green LED in parallel to the coil but in opposite
polarity, the two will flash at two different times as the magnet
poles pass the coil. You might have to experiment with the coil
shape. I suspect that a short coil with lots of layrers should work
best.
Another thing you could try: tape a stack of magnets crossways to a
drill bit, then chuck it in an electric drill and spin it (be
careful, tape it securely so it doesn't fly off and hit someone!)
Carefully hold your coil near the end of the whirling magnet, and you
might get some LED light.
From Lowell Herr
I will assume you mean right after the books are purchased or handed
out. Since my students are going to spend quite a bit of time on the
analysis of data collected for labs, I will set up a number of
stations set up for data collection.
1. An Inertial Balance (of the PSSC variety) with a digital timer
used to determine the period. This will give me a square root
function.
2 ULI and a light probe where we examine an inverse square
function.
3. Pendulum, ULI, and motion detector. This will also generate a
square root function.
4. I will most likely add an experiment using two magnetic wafers.
This will generate an inverse cube function when the force between
(Vernier force probe) the magnets is plotted against separation.
5. Spring, motion detector, and ULI. Again, a familiar function will
be generated.
Students will move from station to station collecting data, enter it
into a spreadsheet and work on the analysis. This will take more than
one day.
From: Raymond Rogoway
I show Road Runner cartoons, two or three. I ask the kids to write
down all the "good" physics they see and all the "bad" physics they
see. This demonstrates, and I affirm, how much physics they already
know. A slight twist is that I introduce the video as a Physics video
and then make a big deal about putting in the wrong one. I ask them
if they want the right one or want to see cartoons.
They of course vote for cartoons and that's when I give them the
good/bad assignment. Makes for a great discussion after. This is done
the very first day of class immediately after taking attendance. The
orientation and green sheet and the rest of the stupid paperwork can
wait a day or two.
I firmly believe that if you can get the kids consent the very first
day or two then the rest of the year goes easier.
Some Tid Bits
These tips were shared at a previous VIP meeting inthe form of a hand
out. written by Martin W. Goehle, Monacan High School Richmond,
Va
These are a few simple teaching ideas that work well:
1. Marble Drop
Have a 5 cm (diameter) circle drawn on a piece of paper. Let students
practice dropping a marble from shoulder height into that circle.
Then, using carbon paper, drop for real (catch marble after one hit).
Draw the smallest circle possible around the marks. The smaller the
circle, the greater the precision. The distance between the radii
(target circle and drawn circle) gives a measure of accuracy.
2. Student Run
Mark off in parking lot (parking space lines do well) 4 or 5 equal
distance intervals. Have students to time at end of each interval and
let a volunteer try to run at a constant velocity. Also, mark off 4
or 5 distance intervals that change with the odd Integers. Reposition
the student timers and let a volunteer try to run at a constant
acceleration.
3. Power
I'm sure you all know the lab involving running up stairs. Using
mass, time to run, and (vertical) height of stairs, power can be
determined.
4. Tracks and Graphing
I have aluminum tracks (like what a French door would slide in) cut
in different lengths. Students time intervals to show constant v, -/+
a You can achieve the same result putting Hot Wheels tracks on long
boards.
The second "tracks" lab they follows this list. It's a good way to
integrate graphing concepts with motion.
5. Torque
a. Have a student hold out a meter stick. Using a loop of string and
a kilogram "hook" mass, slide the mass farther out along the meter
stick.
b. Get two 6' boards (2x6). Divide students into teams of five. On
stairs slide the top board (with one student on end) as far out as
possible. The other four students are on the other end of the bottom
board. BE CAREFUL !!
c. If you do a version of Hewitt's chain of dominoes lab (to
introduce simple kinematics and graphing) another use for the
dominoes is to give students ten and see who can get the top domino
out farthest. You may wish to make rules regarding how they can be
stacked.
6. Waves
Take some slinkies out into the hall and line paper cups on both
sides. When students send a transverse pulse, one row of cups gets
knocked over then the other on the reflection. When two students send
transverse pulses in opposite directions - constructive and
destructive interference can be more readily observed.
7. Helpful Hints:
a. Sound - If you do a speed of sound with water in tubes and tuning
forks, I've found it easier to connect two burets to raise and lower
water level, rather than a tube in a tube.
b. Electricity - I buy Christmas lights after the season, cut up the
line to separate bulbs, solder a clip onto each end and let students
connect those in series/parallel. "D" cells will light them up and
it's easier to construct different resistor combinations.
c. Go to VIP meetings (like this one) and regional/national meetings
(NSTA AAPT) - you'll get more great ideas than you'll ever have time
to try !
FIRST YEAR PHYSICS Experiment 6 - Tracks
II
I. INTRODUCTION
In this laboratory exercise, you will continue to explore graphic
relationships involving quantities in simple Kinematics. It is
important to be able to graph (sketch) motion observed in a lab; and,
conversely, to visualize motion from graphs (sketches). In order to
do so, you MUST know what the terms mean and how quantities are
measured.
II. PROCEDURE
1. Set up tracks that will produce the motion exhibited in each of
the following sketches. Confirm your results with me before
proceeding.

2. Using the following track schematics, sketch v vs t and a vs t
relationships:

III. ANALYSIS
1. Make "track" sketches (as in Procedure 2) for Procedure 1
above.
2. Make x vs t and a vs t sketches for Procedure 1 above.
3. Don't forget the sketches asked for in Procedure 2 above.
4. What IS/ARE the connection(s) among the following plots ?
(d vs t, v vs t, and a vs t.)
5. How is non-uniforrn motion characterized ?
Physics on the Slopes

Wintergreen Resort, a four-season resort near Charlottesville, is
developing a new ski program, designed to combine education and
recreation for high school students taking physics. Although in the
embryonic stage at this point, generally the program's set up will be
similar to existing programs at Paramount's King Dominion and Busch
Gardens. It will involve classroom instruction consistent with
existing physics curriculum while adding a field trip element
featuring practical application of learned formulae and scientific
methods. Some of the same measurement materials that are purchased
for amusement park science trips can also be used on the ski slopes,
e.g the lateral accelerometer can be used as a clinometer.
Wintergreen will even make guest speakers available in classroom
settings to describe the physical properties of snow and snowmaking.
The resort has worksheets available for instructors to distribute to
students. The ski portion of the package will include a lift ticket,
rental skis and a lesson at group rate package prices.
For more information on this program, please contact David Zunker,
Director of Ski Sales at Wintergreen, at (804) 325-8165. Keep an eye
on the Virginia Instructors of Physics web site for more information.
The worksheets will be made available on the site in the next month
or so.
The following is an one example of what the worksheet's content will
look like. This is only a piece of the worksheet.
Physics on the Ski Slopes Worksheet pg 1 of several worksheet
pages
Group Member #1
Group Member #2
Materials:
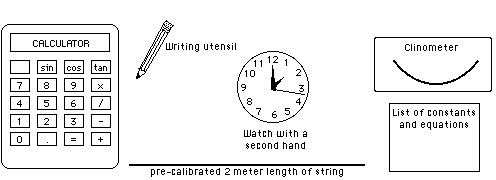
Do not be concerned with neatness. Readability is all that
is needed. Remember to include units on all steps !!! If you write on
the back of the sheet, please indicate this. ** means that these
questions will be graded, so answer them completely.
All NON-SKIERS should do these experiments on the POTATO
PATCH SLOPE.

(always use SI units).
Determination of Angle and Snowpack
1. Choose a ski slope and determine its average angle by using you
clinometer. From the top of the slope, sight the head of a person
approximately equal to your height at the bottom of the slope.
** Name of slope: 
** Angle of the slope sighted by member #1:
** Angle of the slope sighted by member #2:
** Average angle of slope:
** % Deviation:
2. Using the same ski slope. look up the average snow pack depth for
your slope. the numbers will be posted next to the door going to the
slopes.
** Average Snow Depth (in):
** Average Snow Depth (m):
Determination of Length of Slope
3. Standing near the ski lift, count the total number of chairs
moving UP the slope at any instant.
** Describe how you came up with this number.
** Number of chairs on one side of the lift:
4. Determine the distance between chairs using you clinometer and
triangulation. (Sight the second chair when first chair is
perpendicular to you.)
** Perpendicular distance to ski lift line:
** 2nd Chair Angle sighted by member #1:
** 2nd Chair Angle sighted by member #2:
** Average Angle: ** % Deviation:
** Show calculations (use average angle) for distance between
chairs:
** Average distance between chairs:
** Using #3, calculate the length of the slope:
Wintergreen length: ** % Error:
Determination of the Diagonal ... The worksheets continue on. Because
of space we only printed the beginning. Other parts are Energy and
the Costs of the Chairlift, Energy Uses in Skiing, Ski Friction and
Dynamics, Group Activities and Rest Time.
Dimensional Analysis
(or Factor Label)
You know... It is where you use the units of the numbers fo find
conversion factors and the answers to problems like, "How many drops
of water are in a completely filled gallon jug?" On the following
page is a worksheet that can be used at the beginning of the year
when you are covering dimensional analysis. The sheet makes for
interesting, nerdy, practice. INDY RACING
DIMENSIONAL ANALYSIS
SHEET
by Tony Wayne

BACKGROUND
The "Indianapolis 500" is 500 miles long on a race track that is made
with 4 turns. The race takes 200 laps to finish. Depending on how a
car races is can get between 1.8 and 5 miles per gallon. (1.8 mph
when flat out racing and 5 mph when running caution laps.) The cars
can generate 700+ hp and have a weight of 1550 pounds. The car's
engines utilize a methanol fuel that costs $3.00 per gallon. Each car
is given a pumping tank behind the pits that can only 278 gallons of
fuel. The fuel tank holds 40 gallons of fuel. An average speed for
the entire field of cars can be as high as 185 miles per hour. The
lead car can have an average speed of 233 miles per hour. During a
caution lap, yellow flag, the car's will travel around at about 70
mph.
QUESTIONS
1 What is the length of a lap of track?
2 What is the mass of an indy race car in kg?
3 How much does it cost to fill the car's tanks of gas?
4 How many mile pass before a fuel hungry car goes in for a refueling
pit stop?
5 How many gallons of fuel are used in a race when flat out
racing?
6 How many gallons of fuel are used per lap by a car when it is flat
out racing?
7 How much does it cost to pay for the fuel used to run an entire
race when flat out racing?
8 If a car refuels every 20 laps, how many gallons of fuel are used
between refueling pit stops?
9 How much time does it take to for the leader to travel around the
track once when flat out racing, in seconds?
10 How long does it take for the lead car to finish the race,
assuming no yellow flagged laps?
11 How much time does it take to for the leader to travel around the
track once during a caution lap?
12 In a race, 25 of the 200 laps are run under a yellow flag. A
yellow flagged lap is run when there is a problem on the track and
the car's need to slow down. How long does it take to for the leader
to finish a race of 500 miles?
13 When racing flat out, how many laps can a car travel before
running completely out of fuel? How many refueling pit stop does a
car need to make during a race? INDY RACING
DIMENSIONAL
ANALYSIS ANSWERS
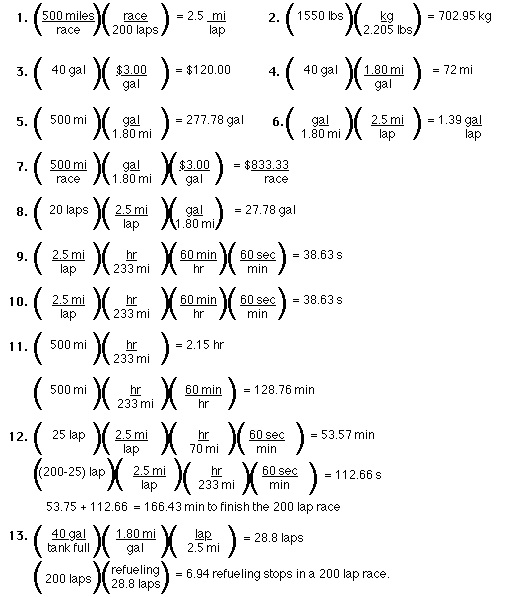
|